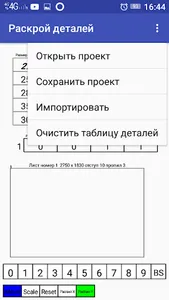
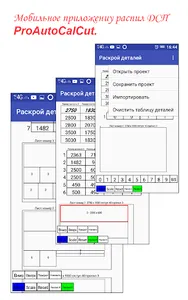
In the mobile application, the cutting editor ProAutoCalCut can be opened, the previously saved project of cutting the details with the operation “Open project”. You can save the nesting project using the Save Project operation. Using the operation "Import" you can download a file a copy of the project
wardrobe designed with the help of mobile wardrobe designer ProAutoKupe.
In the chipboard size table, you can select go from standard chipboard sizes or specify a new size of a particle board sheet. In the same place the distance from the sheet edge is set, the thickness is cut. In the detail table, dimensions of workpieces of parts are cut, parts can be copied, deleted, rotated, positioned parts along the cutting axis X or Y. To import wardrobe parts from the ProAutoKupe application, you must select the name of the cabinet project and import.
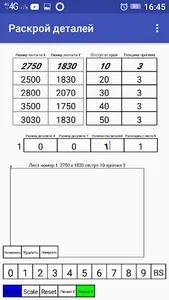
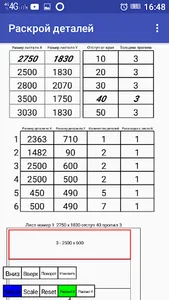
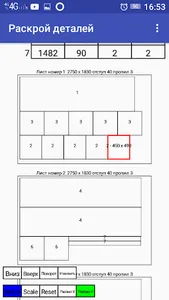
After importing the project of the wardrobe from the ProAutoKupe mobile application, to do this, select the name of the project of the cabinet and select the operation in the top “Import”. The screen will display a table of cabinet details - the compartment, their dimensions, the number and the value of the number of chipboard sheets - “Layout from sheet N”, from which the initial layout of parts of the cabinet originates. By selecting the details of the cabinet on the screen using the commands "Up", "Down" you can move the parts along the chipboard. Rotate parts using the “Rotate” command, using the “Cut X”, “Cut Y” commands to arrange the cabinet parts along the X or Y axis. To reduce the size of the detail table, the “Pack” command groups all parts with the same dimensions into one line indicating the number of such parts .
If the cabinet door must be made on a chipboard blank of smaller thickness, and the remaining parts of greater thickness, the cabinet door can be moved to one blank, and the remaining parts can be placed on other chipboard blanks. To do this, in the details table, for details of the cabinet, in the field “Layout from sheet N” indicate the value of the chipboard sheet from which further layout of parts will usually occur from 2 sheets of chipboard.
If any changes are made in the parts table, the part is rotated by the “Rotate” command, the part is moved by the “Up” or “Down” commands on the chipboard sheets, the optimal redistribution of the remaining parts on the chipboard blanks occurs automatically.
All comments and suggestions can be sent to email: alfadansoft@gmail.com
In the design of the images was used the resource has been created by Vlad Litvin: https://www.behance.net/randomx
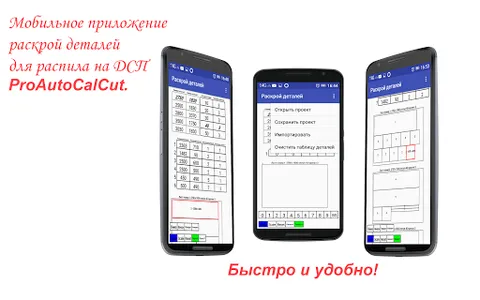
wardrobe designed with the help of mobile wardrobe designer ProAutoKupe.
In the chipboard size table, you can select go from standard chipboard sizes or specify a new size of a particle board sheet. In the same place the distance from the sheet edge is set, the thickness is cut. In the detail table, dimensions of workpieces of parts are cut, parts can be copied, deleted, rotated, positioned parts along the cutting axis X or Y. To import wardrobe parts from the ProAutoKupe application, you must select the name of the cabinet project and import.
After importing the project of the wardrobe from the ProAutoKupe mobile application, to do this, select the name of the project of the cabinet and select the operation in the top “Import”. The screen will display a table of cabinet details - the compartment, their dimensions, the number and the value of the number of chipboard sheets - “Layout from sheet N”, from which the initial layout of parts of the cabinet originates. By selecting the details of the cabinet on the screen using the commands "Up", "Down" you can move the parts along the chipboard. Rotate parts using the “Rotate” command, using the “Cut X”, “Cut Y” commands to arrange the cabinet parts along the X or Y axis. To reduce the size of the detail table, the “Pack” command groups all parts with the same dimensions into one line indicating the number of such parts .
If the cabinet door must be made on a chipboard blank of smaller thickness, and the remaining parts of greater thickness, the cabinet door can be moved to one blank, and the remaining parts can be placed on other chipboard blanks. To do this, in the details table, for details of the cabinet, in the field “Layout from sheet N” indicate the value of the chipboard sheet from which further layout of parts will usually occur from 2 sheets of chipboard.
If any changes are made in the parts table, the part is rotated by the “Rotate” command, the part is moved by the “Up” or “Down” commands on the chipboard sheets, the optimal redistribution of the remaining parts on the chipboard blanks occurs automatically.
All comments and suggestions can be sent to email: alfadansoft@gmail.com
In the design of the images was used the resource has been created by Vlad Litvin: https://www.behance.net/randomx
Show More